

Ever wish their was a product out there that would do exactly what you wanted and how you wanted? Problem is there are many smart home devices that do some things well and not others or they work very well, but have horrible apps and no way to connect everything together across different manufactures. Some devices I wanted to use only worked with Google, Amazon, Samsung, or whomever. I have apple devices and quite a few neat smart devices lacked native integration or needed me to download multiple apps and create multiple accounts just to use them. That is a big NO for me, I like a single app, a single dashboard and something that works whether you are on an Android, Apple, PC or anything with an internet connection. The ESPhome add-on for home assistant is my go to.
Using inexpensive kits like this one, I can flash ESPHome and create all kinds of custom devices. Simple devices like light switches and smart relays to control lights and appliances around the house to more complex things like controlling the boiler or water heater.
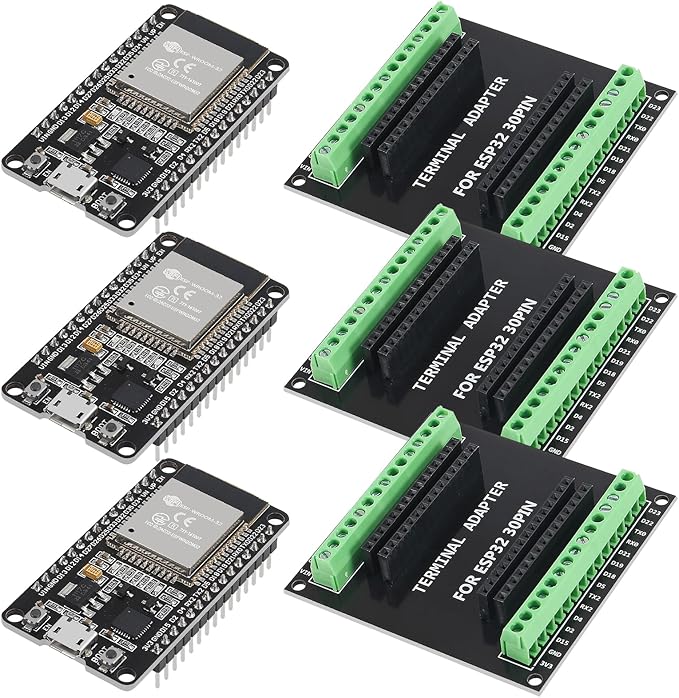
I particularly love these kits as they come with the terminal board making connections extremely easy. If I need to remove or replace the ESP32 board for programming or replacement, it is as simple as plugging it in. ESPHome also supports OTA or over the air updates so updating the firmware or making changes to your configuration does not require you to unplug the board to make changes. This is a wonderful thing as some of my controllers are in difficult to reach locations. All updates and configurations are done over WiFi. Another beautiful thing about the ESP32 controllers is low power consumption, I have 4 running off a single phone charger. Other micro controllers are supported, but, the ESP32 has a bigger support base.
In terms of actually configuring your devices, it is all done in YAML. There is a bit of a learning curve, but, once you get a hang of how they work, the syntax is easy to understand. I admit, I do use some AI to help me out with more complex configuration files, ChatGPT is a great resource for this. If you do use AI, make sure to double check everything and tweak it to your particular setup. Below is the code that controls my attic fan.
esphome:
  name: "attic-fan"
  friendly_name: Attic-Fan

esp32:
  board: esp32dev
  framework:
    type: arduino

# Enable logging
logger:

# Enable Home Assistant API
api:
  encryption:
    key: "Your_Actual_Key_Would_Go_Here"

ota:
  - platform: esphome


wifi:
  ssid: !secret wifi_ssid
  password: !secret wifi_password

  # Enable fallback hotspot (captive portal) in case wifi connection fails
  ap:
    ssid: "Esphome-Web-98C264"
    password: "OTAPass"

captive_portal:

sensor:
  - platform: dht
    pin: GPIO22
    temperature:
      name: "Attic Temperature"
      id: Attic_Temp
    humidity:
      name: "Attic Humidity"
      id: Attic_Humid
    update_interval: 30s
  - platform: internal_temperature
    name: "Attic Fan Controller Temp"


switch:
  - platform: gpio
    name: "Attic_Fan"
    pin: GPIO23
    id: Attic_Fan

climate:
  - platform: thermostat
    name: "Attic Fan Thermostat"
    sensor: Attic_Temp
    humidity_sensor: Attic_Humid
    min_cooling_off_time: 300s
    min_cooling_run_time: 300s
    min_idle_time: 30s
    cool_action:
      - switch.turn_on: Attic_Fan
    idle_action:
      - switch.turn_off: Attic_Fan
    default_preset: Home
    preset:
      - name: Home
        default_target_temperature_high: 24 °C
A breakdown of the code…
So the first few lines give the controller it’s identity, sometimes the “name” is something weird assigned by the ESPHome compiler. The “friendly name” is what you see when you search for the config file and when you are looking for the entities in home assistant.
Sensor tells the micro controller there is a sensor connected and will define the kind of sensor connected to that pin on the micro controller. In my system, I am using a DHT20 temperature and humidity sensor. I also gave it a name, told the firmware what pin the sensor is connected too and the sensor’s ID. The name is so it is easy to find in the code and later in Home Assistant if you want to add the sensor data to a dashboard card. ID is what the firmware will reference to.
In order for something to be turned on or off, an output will need to be created. In the case of using a thermostat to control the fan, I needed to create a switch. Same kind of naming structure as the other entities in the firmware takes place. There are many different kinds of outputs you can create. Switch is by far the simplist one to set up and is needed for the “thermostat” control.
Climate tells the micro controller it will be performing climate control. I then tell the firmware I want to create a thermostat. I used the sensor id and tell the thermostat entity what and how it will control the “switch.”
Keep in mind when configuring your firmware all the temperature readings are in Celsius. Home Assistant is what does the conversions to Fahrenheit for me, but, if you wanted to create a readout or connect a display to your controller, you can certainly do that, but if you want to read out Fahrenheit without Home Assistant doing the conversion, you can create a virtual sensor and input the formula to convert it for you.
So that is it, that is the basics on creating a smart thermostat using roughly $25 in parts and a few minutes connecting everything up and writing the configuration files. There is so much you can do with ESPHome. Their documentation is amazing and you can have multiple things connected to a single controller reducing costs. It is a truly universal platform. New sensors and compatible devices are being added every day and everything receives regular updates to the software making it even better as time goes on.
I will share my ESPHome creations here. Feel free to use the code in your own projects and I am always open to suggestions or ways to make my systems better. Happy Tinkering!